btc-ticker
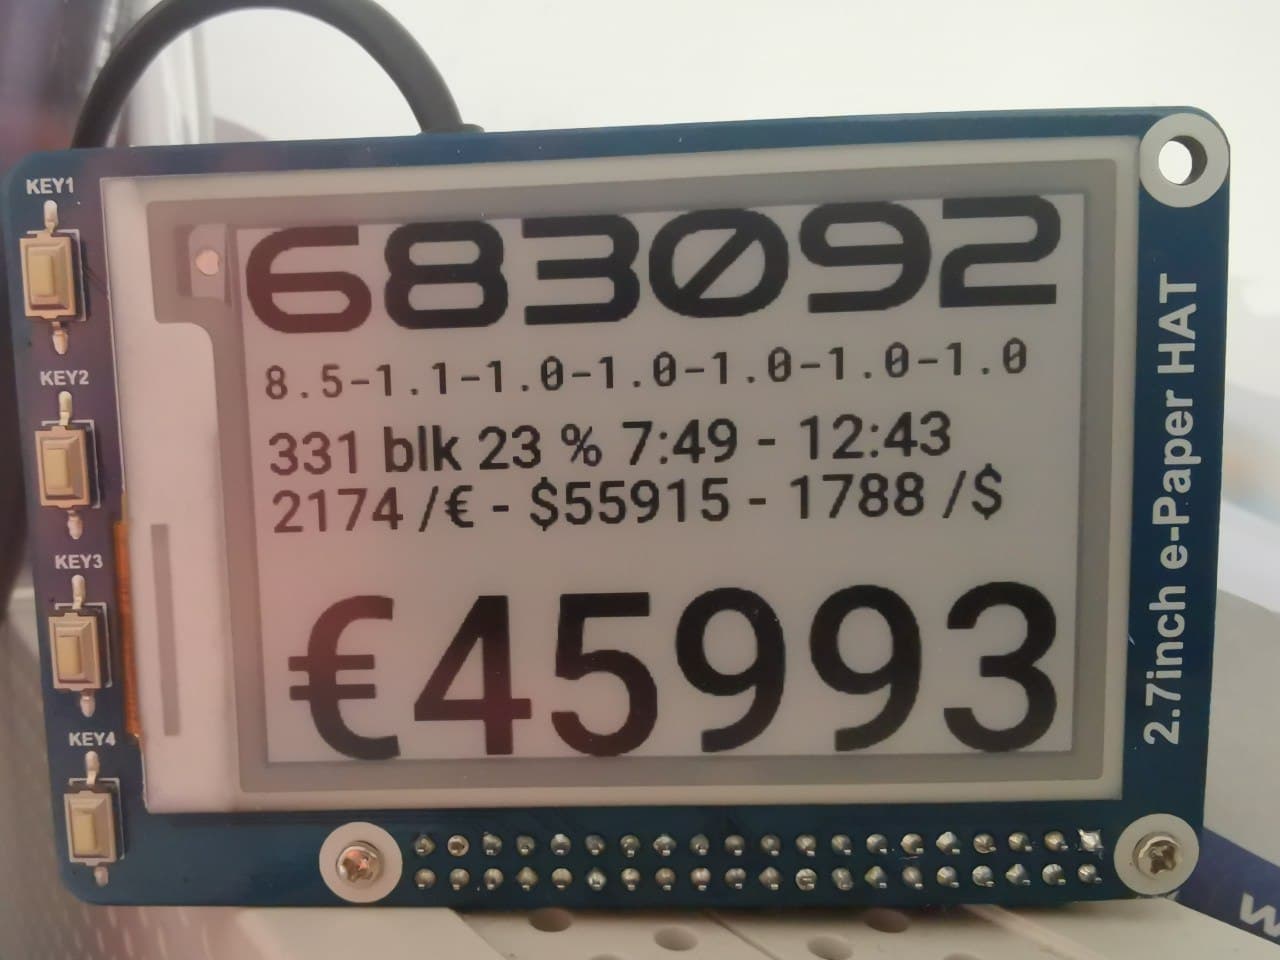
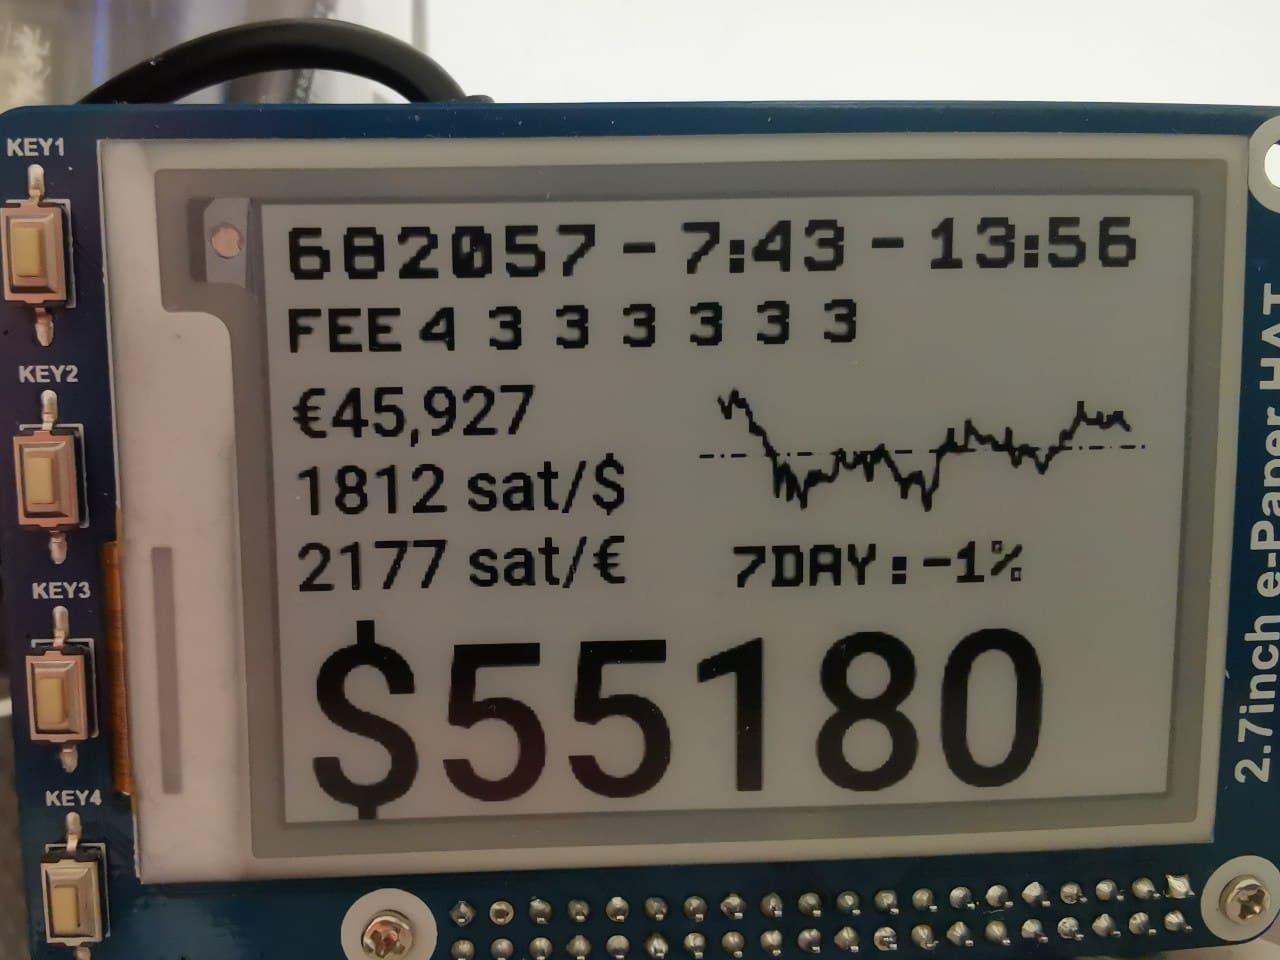
bitcoin-ticker is a E-ink ticker that shows usefull information about bitcoin. Due to the limited refresh lifetime, new information is currently shown every 5 minutes and whenever a new block arrives.
The github can be found here: https://github.com/btc-ticker/btc-ticker


Hardware
- waveshare 2.7 e-Paper HAT (e.g. from berrybase, welectron, reichelt)
- rasberry pi zero WH (e.g. from berrybase)
- Power supply Micro USB 5V (e.g. from berrybase)
- micro SD card with 16 GB or more (e.g. from berrybase)
- Printed Case (e.g. Typ B from ebay oder ebay-kleinanzeigen)
I'm currently working on a 7.5 inch version with the following e-Paper:
- waveshare 7.5 V2 (e.g. from berrybase)
The config.ini needs the following settings when using the 7.5 inch:
epd_type = 7in5_V2
orientation = 270
Usage
Ticker view
The Tickers the following information:
- Block height, Mean block intervall in minutes, Time
- Minimal Block fee for the first 7 blocks in mempool
- Dollar price of a bitcoin
- Satoshi per Dollar (also know as moskow time)
- Sotoshi per Euro
- Euro price of a bitcoin
Whenever a new block has arrived on the blockchain, the following information is shown for 120 seconds (can be disabled in the config.ini):
- Euro price of a bitcoin, mean block intervall in minutes, Time
- Minimal Block fee for the first 7 blocks in mempool
- Blocks in mempook, Number of transaction in mempool
- Blocks until next difficulty retargeting, est. difficulty multiplier, est. retarget time
- Block height
Due to the limited lifetime of 1000000 refreshes and an expected lifetime of 5 years, the refresh period has been set to 216 seconds.
Buttons
There are four buttons which the following behaviour (Please be patient after pressing, the e-ink is quite slow):
- Switch through different ticker views
- Switch BTC/fiat graph through 1, 7 and 30 days
- Switch the layout of the ticker
- Switch inverted mode
Switching to ro-mode
Per default, the file system is mounted writable. When there is a empty ro file in /boot, the filesystem will remounted readonly.
sudo touch /boot/roenables the readonly remount. The file can also be created with a PC, similar to the ssh file.
Switching between ro and rw mode
After logging in with ssh,
rwremounts the file system with write support.
roswitches back to readonly.
Config.ini
It possible to personalize the ticker to your needs. After logging into your raspi with SSH, the config can be edited with
rw
nano config.ini
ro
After writing the change to the ini file, a restart of the btc-ticker service is needed:
sudo systemctl restart btctickerUpdate btc-ticker without reflashing the sdcard
After logging into the btc-ticker with SSH, the update can be started with
rw
./99updateMenu.sh
Select now:
- PATCH
- Patch menu
- PATCH
to update the ticker to the newest updates from git.
Download image
- Downlad version 0.7.0 from btc-ticker-0_7_0.img.gz
- Verify SHA256 checksum. It should be:
fc5d16a6ee23e8843db7aeee0bc338a20cfa34e134df571bf520caf5c26b21a1
Flash SDcard with Raspberry Pi Imager
Use https://www.raspberrypi.com/software/ for flashing the image to the sd-card.
- Select btc-ticker img file
- select sdcard
- Before writing click on settings and modify the following settings
- enable ssh with Use password authentication
- set username and password and write Username: admin Password: btcticker
- enable WiFi and enter your WiFi connection details
- start with clicking on write
wpa_supplicant.conf (only when not using settings on Imager)
When you use the Raspberry Pi Imager with settings, there is no need for adding wpa_supplicant.conf manually.
When you did not enter your wifi credentials in the settings menu, you need to do thefollowing:
- add
wpa_supplicant.confto the boot partition when mounted on PCctrl_interface=DIR=/var/run/wpa_supplicant GROUP=netdev update_config=1 country=[COUNTRY_CODE] network={ ssid="[WIFI_SSID]" psk="[WIFI_PASSWORD]" key_mgmt=WPA-PSK } - replace
[COUNTRY_CODE]with the ISO2 code (e.g. DE) - Set
[WIFI_SSID]and[WIFI_PASSWORD] - On the first boot, the filesystem is mounted writable (Necessary for coping the wpa_supplicant.conf).
- When there is no wpa_supplicant.conf at /boot, the filesystem will be mounten readonly.
Build SDcard from scratch
The SDcard build process is inspired by the great raspiblitz.
- Download lastest raspios image
- Write the Image to a SD card Tutorial
- Add a
sshfile to the boot partition when mounted on PC - Add a
wpa_supplicant.conffile, as shown in the section before. More information are also available here - Login via SSH to
ssh pi@[IP-OF-YOUR-RASPI]using passwordraspberry
The image can now be build with:
wget https://raw.githubusercontent.com/btc-ticker/btc-ticker/main/build_sdcard.sh && sudo bash build_sdcard.shAfter everything run through, it is possible to login with the password btcticker
In order to prepare everyting for release, run /home/admin/XXprepareRelease.sh. When you just want to use it for yourself, you do not need to run /home/admin/XXprepareRelease.sh.
Changing the ssh password
In order to secure your btc-ticker in your local network, you should change the SSH password after setting up everything.
- Login via SSH to
ssh admin@[IP-OF-YOUR-RASPI]using the passwordbtcticker - Change the password (this will be improved in the next release)
echo "pi:NEWPASSWORD" | sudo chpasswd
echo "root:NEWPASSWORD" | sudo chpasswd
echo "admin:NEWPASSWORD" | sudo chpasswd
Replace
NEWPASSWORDwith the new password.
Used APIs
btc-ticker is using the following APIs:
- mempool.space/api, which can also be run locally in e.g. raspiblitz
- coingecko api
- blockchain API v1